JET 708492K Manuel d'utilisation et d'entretien
Naviguer en ligne ou télécharger Manuel d'utilisation et d'entretien pour Outils électriques JET 708492K. JET 708492K Use and Care Manual Manuel d'utilisatio
- Page / 40
- Table des matières
- MARQUE LIVRES
- 10-inch ProShop 1
- Table Saw 1
- 1.0 Warranty and service 2
- 2.0 Table of contents 3
- 3.0 Safety warnings 4
- 3.1 Kickback 5
- 4.0 About this manual 6
- 5.0 Glossary 7
- 6.0 Features 8
- 7.0 Specifications 8
- 8.0 Setup and assembly 10
- 8.2 Unpacking and cleanup 11
- 8.3 Installing legs 11
- 8.4 Handwheels 11
- 8.11 Riving knife 13
- 8.12 Anti-kickback pawls 13
- 8.13 Blade guard 14
- 8.17 Table insert 15
- 8.18 Miter gauge 15
- 9.0 Electrical connections 16
- 10.0 Adjustments 17
- 11.0 Operations 19
- Rip sawing 20
- Resawing 22
- Crosscutting 22
- Bevel and miter operations 23
- 12.0 Safety devices 24
- 13.0 Maintenance 25
- 14.0 Optional accessories 26
- 16.0 Replacement Parts 27
- 427 New Sanford Road 40
- Phone: 800-274-6848 40
Résumé du contenu
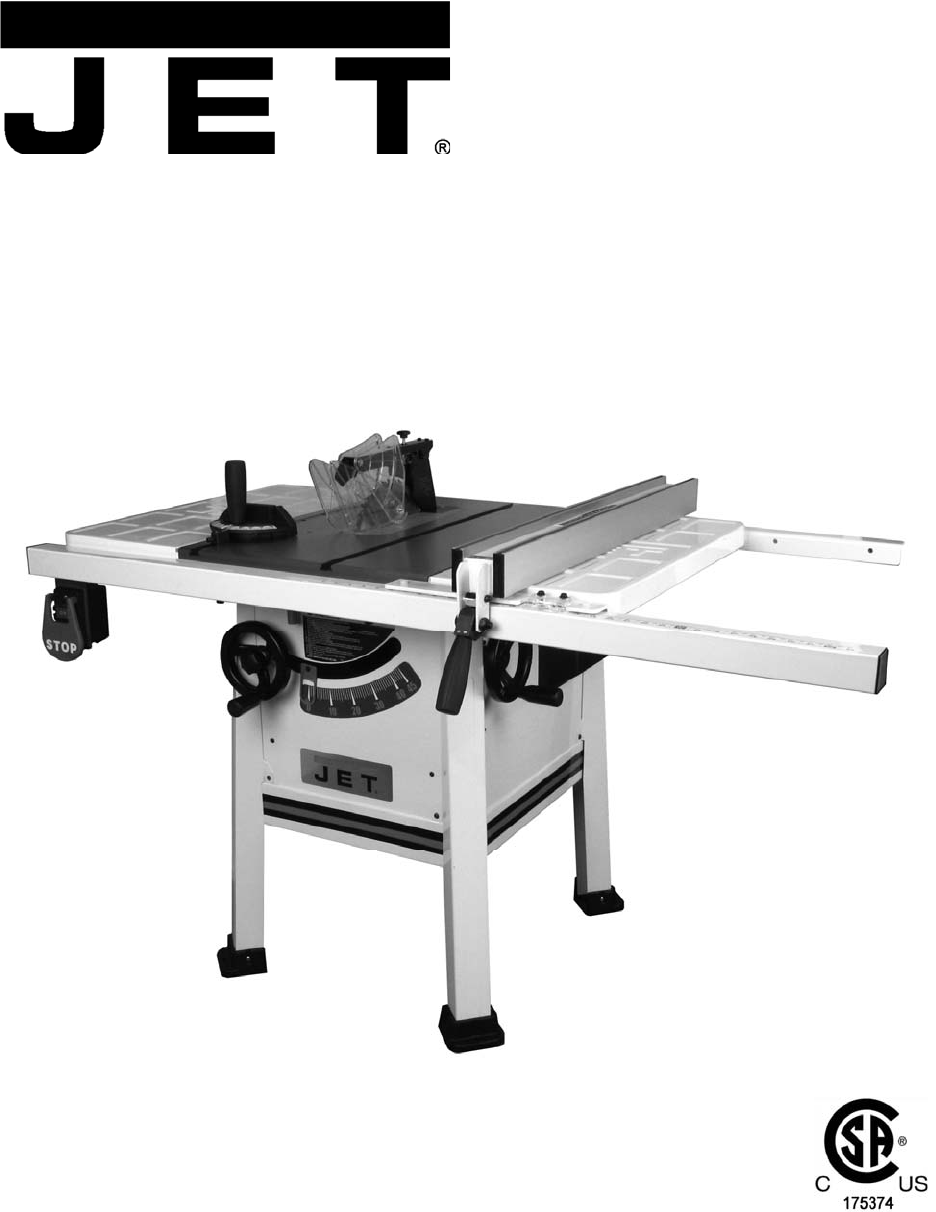
Operating Instructions and Parts Manual 10-inch ProShop™ Table Saw with Riving Knife Model JPS-10TS (shown with steel wings and 30” rail set)
108.0 Setup and assembly 8.1 Shipping contents Carton contents (see Figure 2) NOTE: Some parts may have come pre-assembled to the table saw. 1 Ta
11 Read and understand all assembly instructions before attempting assembly. Failure to comply may cause serious injury. The main saw unit is heav
128.5 Extension wings Referring to Figure 7: Make sure mating surfaces are clean and free of burrs. 1. Attach right extension wing (J) to saw table
13 Figure 10 8.11 Riving knife Referring to Figure 11: Figure 11 1. Set saw blade to 90-degree (vertical) position and raise it all the way (refer
14 Figure 14 8.13 Blade guard Referring to Figure 14. 1. Push up guard leaves (B) until they catch and hold on the peg (C). 2. Lower blade guard
158.15 Aligning blade guard and riving knife Referring to Figure 17: 1. Remove blade guard and hold anti-kickback pawls (J) away from table surfac
16You can adjust any play of the miter gauge in the table slot by tightening set screws (E). Calibration If a miter angle at the -45º, 90º or +45º is
17junction box (A, Figure 21), tilt blade to 45 degrees, and remove right side cover. Figure 21 The plug on the end of the motor cord must be replac
183. Set blade 90º to table by turning blade tilting handwheel (D, Figure 23) counterclockwise as far as it will go. Do not force beyond stop. 4. P
19 Figure 26 10.3 Table to blade alignment Refer to Figures 27 and 28. The table has been set square with blade by the manufacturer and no adjustme
2 1.0 Warranty and service Walter Meier (Manufacturing) Inc., warrants every product it sells. If one of our tools needs service or repair, one of o
20 Not maintaining alignment of the rip fence so that it tends to angle toward rather than away from the saw blade front to back. Applying feed fo
21 Never reach behind the blade with either hand to hold down or remove the cutoff piece with the saw blade rotating. Always use blade guard, split
22Resawing Resawing is a ripping operation in which thick boards are cut into thinner ones. Narrow boards up to 3" can be resawn in one pass. Wi
23Provide auxiliary support for any workpiece extending beyond the table top with a tendency to sag and lift up off the table. Have the blade extend
2412.0 Safety devices Feather board The feather board (Figure 42) should be made of straight grain hardwood approximately 1" thick and 4"
25 Figure 45 – Push stick template 13.0 Maintenance Always disconnect power to the machine before performing maintenance. Failure to do this may
2614.0 Optional accessories These accessory items, purchased separately, can enhance the functionality of your table saw. Contact your dealer to or
2715.0 Troubleshooting the JPS-10TS Symptom Possible Cause Correction Motor will not start Low voltage. Check power line for proper voltage. Open
2816.1.1 Motor and Trunnion – Exploded View
2916.1.2 Motor and Trunnion – Parts List Index No Part No Description Size Qty 1 ... VB-A31 ... V-Belt ...
3 2.0 Table of contents Section Page 1.0 Warranty and service...
30Index No Part No Description Size Qty 55 ... JWTS10-155 ... Wave Washer ...WW-
31Index No Part No Description Size Qty 102 ... TS-2245122 ... Socket Head Button Screw ...M5-0.8Px12
3216.2.1 Table and Cabinet – Exploded View
3316.2.2 Table and Cabinet – Parts List Index No Part No Description Size Qty 1 ... JPS10TSR-301 ...Table ...
34Index No Part No Description Size Qty 54 ... JPS10TSR-354...Lock Knob ...
3516.3.1 Stand Assembly – Exploded View 16.3.2 Stand Assembly – Parts List Index No Part No Description Size Qty 1 ... TS-224612
3616.4.1 Cast Iron Wings – Exploded View 16.4.2 Cast Iron Wings – Parts List Index No. Part No. Description Size Qty 1 ... JP
3717.1 Electrical Connections – 115V
3817.2 Electrical Connections – 230V
39
4 3.0 Safety warnings 1. Read and understand the entire owner's manual before attempting assembly or operation. 2. Read and understand the w
40 WALTER MEIER (Manufacturing) Inc. 427 New Sanford Road LaVergne, Tennessee 37086 Phone: 800-274-6848 www.walter
5 23. Give your work undivided attention. Looking around, carrying on a conversation and “horse-play” are careless acts that can result in serious in
6 Familiarize yourself with the following safety notices used in this manual: This means that if precautions are not heeded, it may result in minor
7 5.0 Glossary Arbor: Metal shaft that connects the drive mechanism to the blade. Bevel Edge Cut: Tilt of the saw arbor and blade between 0° and 45
8 6.0 Features Figure 1 7.0 Specifications Model number ......
9 Arbor and blade: Blade included ...........................
Produits connexes et manuels pour Outils électriques JET 708492K
 (24 pages)
© 2020, manymanuals.fr. Tous droits réservés | 1.953 s |
 Manymanuals.com
 Manymanuals.de
 Manymanuals.fr
 Manymanuals.it
 Manymanuals.pl
 Manymanuals.cz
 Manymanuals.es
 Manymanuals-pt.com
Commentaires sur ces manuels